The project replaced fencing and gates on all four sides of the lot.
The existing structures consisted of dog ear cedar and plastic lattice panels mounted on pine stringers and steel poles using conventional hardware.
Project Drivers
The existing structure was aesthetically inconsistent and in various states of disrepair including termite infestations. Additionally, a lesson learned from the Paradise wildfire was that fencing provided fuel tot eh fire which hastened the spread through residential areas.
Solution
Decorative steel panels to create a cohesive modern aesthetic that integrates with the local architecture.
Structural Design and Findings
Descriptions here are for the design of the fence and include the updates that were done during the build as experience was gained.
Surrounding wall
Existing walls and support poles remained in place, however it was found the concrete block wall was not grout filled (common occurrence) thus the poles were only bolted to the capstone which in some places were loose. Where capstones were loose and critical to the support of the poles, the cavity was filled with wine bottles (since the lower portion of the wall was structurally sound) and concrete.
Fence stringers
The wooden stringers (horizontal 2×4) were removed on the facing side and retained on the opposing side. The original design was to have the neighbor’s fencing removed and have a single layer fence. As they wished to keep their existing fencing, the wood remaining was repaired for dry rot and termite damage and then spot treated with Orange Oil sprayed with a Boric Acid solution. The exposed white lattice was spray painted brown to keep it from “shining” through the metal piercings.
Mounting hardware
Several designs and attempts were done:
- Idea: sheet metal clip, hard to fabricate, custom fabrication would be expensive.
- Tried: Framing the panels in redwood 2×2. This resulted in a chemical reaction between the tannin in the redwood and the iron to make a black stain that would run down the walls. This also accelerated oxidization of the steel panels. The redwood was stripped off and discarded.
- Final: Aluminum “F” channel was cut into 3” lengths and drilled to make clips to attach the panels to the stringers. Since this was a lot of cutting the neighbors radial arm saw fitted with a diamond blade seemed to work best. A fine tooth metal blade might work but the metal is soft and can gum up some blades. The clips were spray painted with an antique copper finish to blend in. The paint was also used to touch up exposed metal hardware.
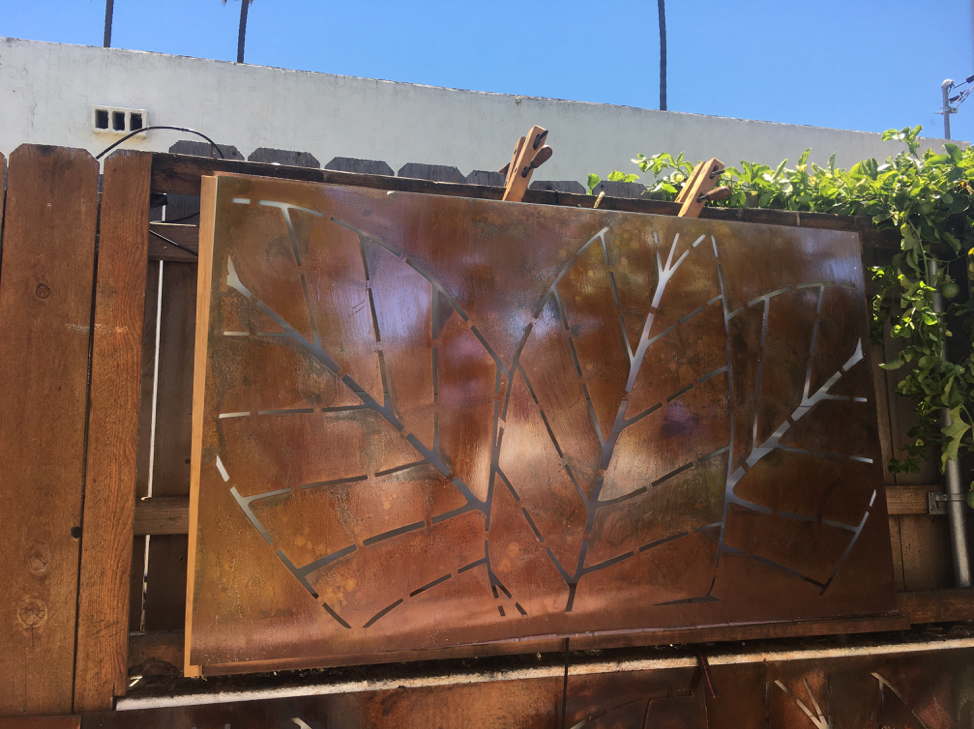
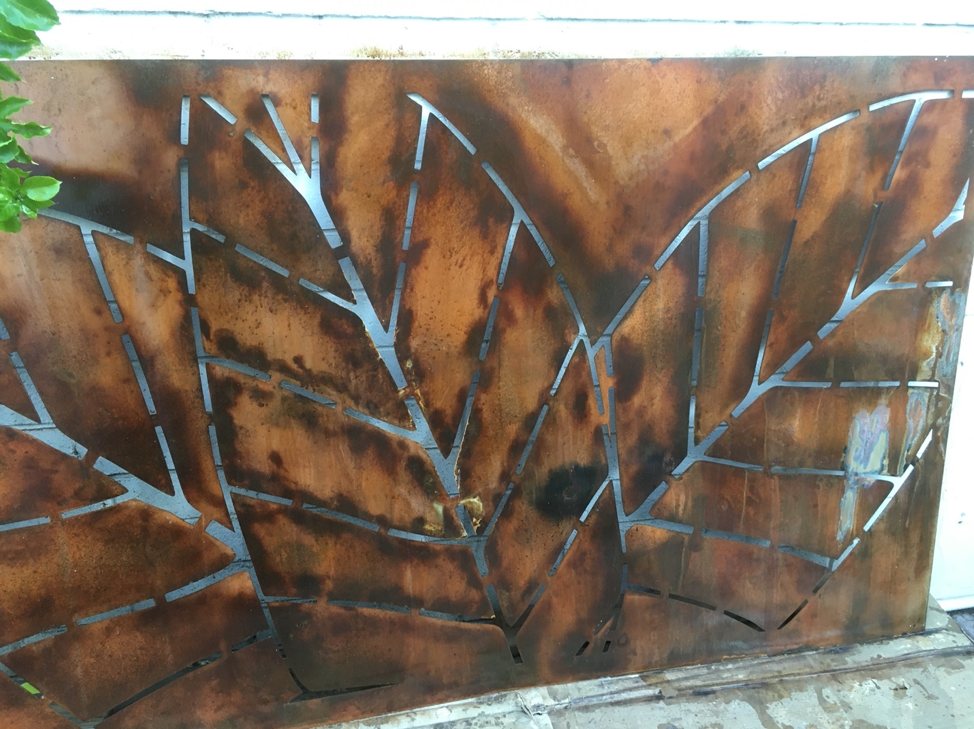
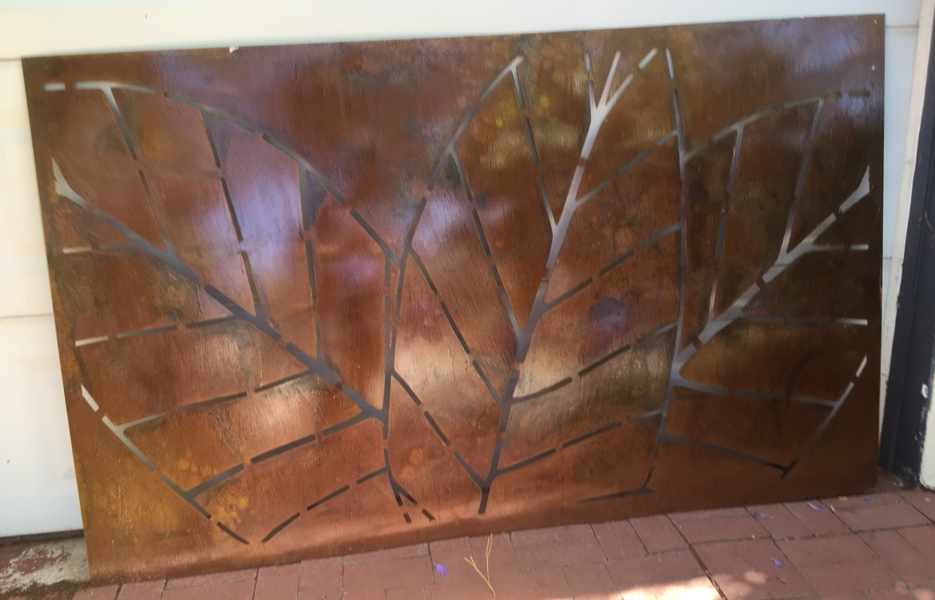
Panels
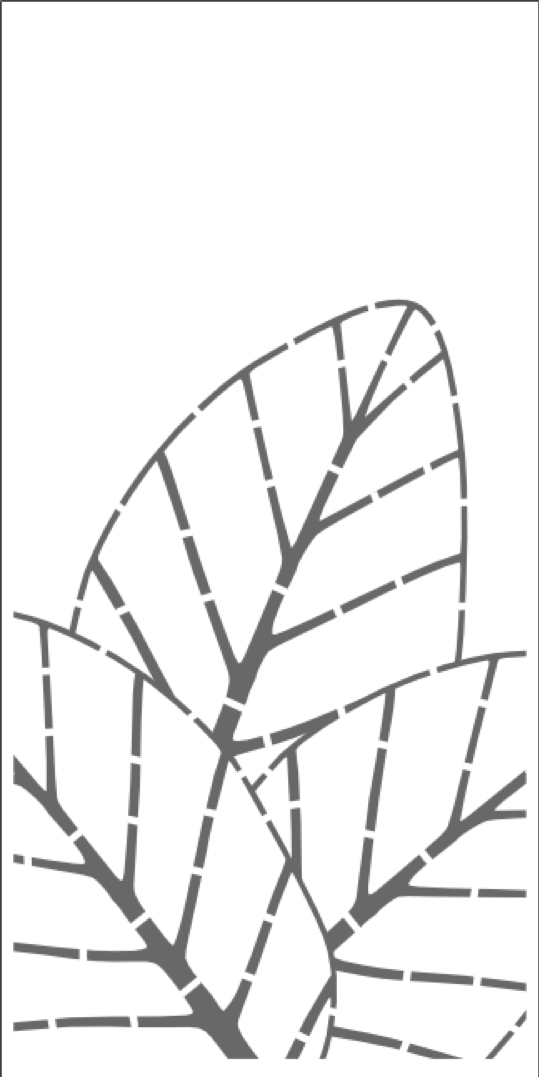
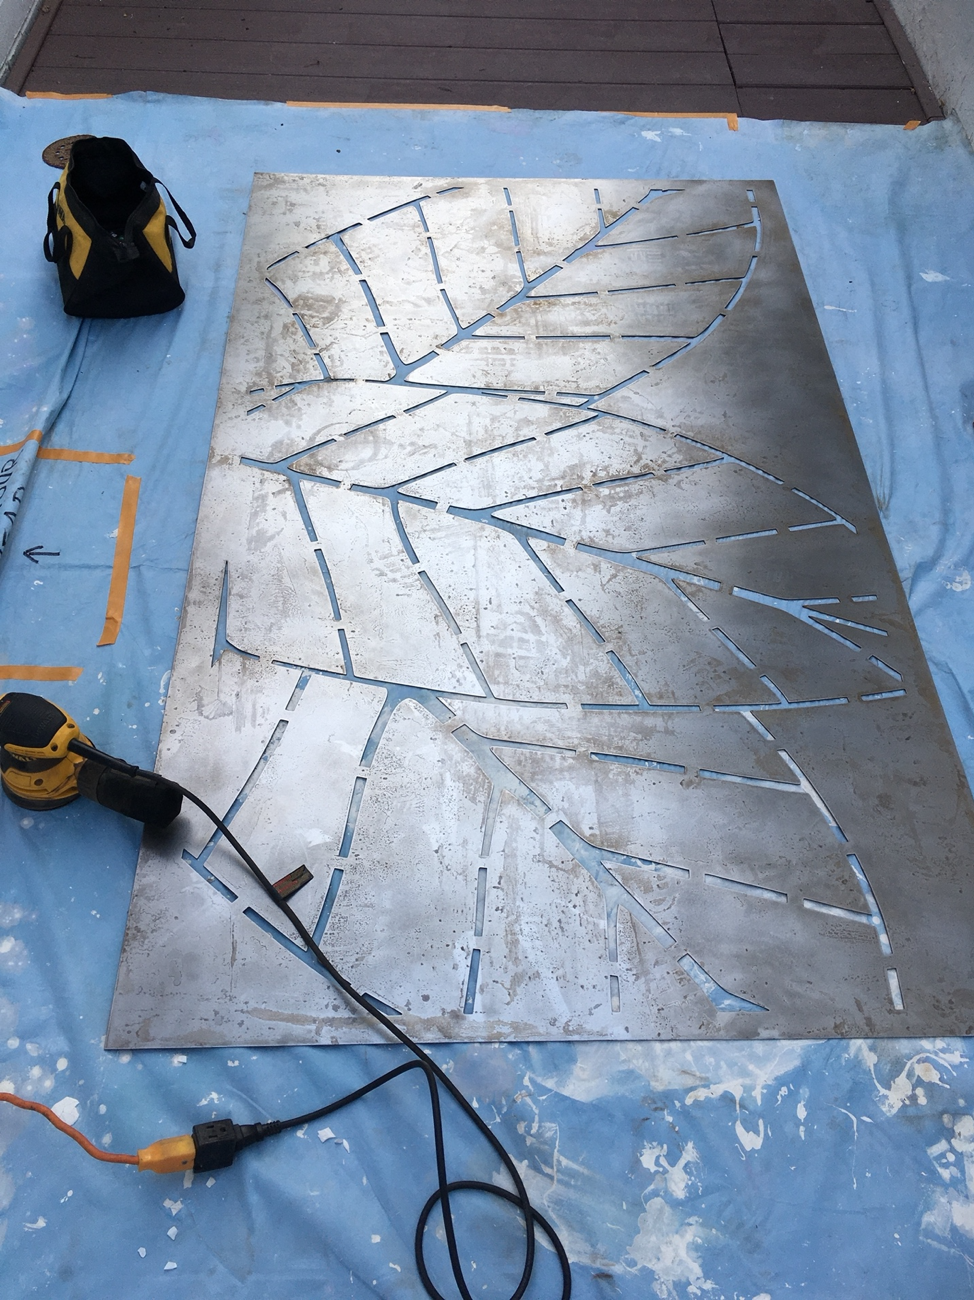
The steel was ordered from IMS locally. They took care of cutting the panels from larger stock so those calculations were not needed. Alternatively, the water jet cutter could have cut the panels from the raw stock. One pane was cut an inch short by mistake so I recommend the latter option which also gives the cutter “handles” for working with the material. IMS drop shipped to the cutter directly.
The cutter needed vector-based artwork. I used Visio for the initial designs but switched to InkScape (free) which had better controls and export options. When the cutter imported the supplied drawings to the machine there were some changes in dimensions which we worked through over the phone and facetime. They also cut a sample piece on scrap metal so we could confirm the size and design before all the steel was cut. Cutting and delivery was easy from there.
Handling the panels was sometimes tricky as the design left a somewhat weak spot in the center which required caution when moving or lifting to prevent folding. A motor cycle strap turned out the be the best by putting the hooks through the design and then carrying the panel like a large purse. The steel was also thick enough that getting cut by edges was not a risk but not so thick that they could not be raised or moved by a single person.
Finishing
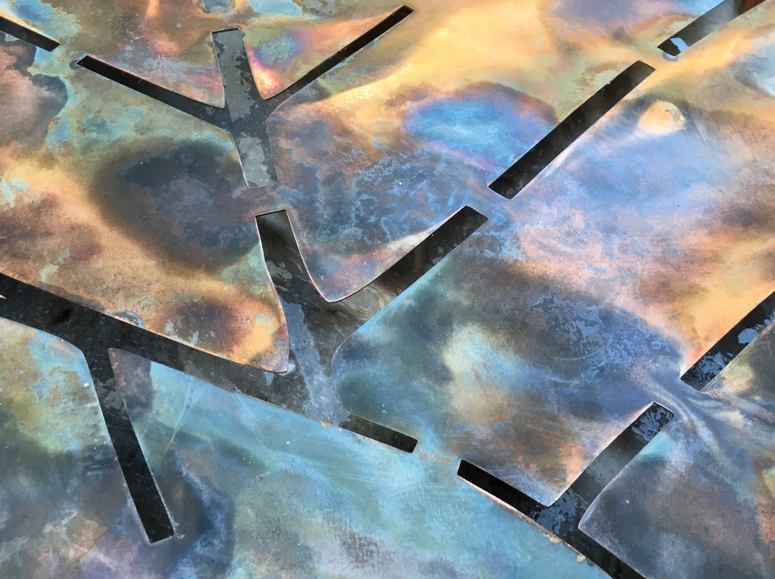
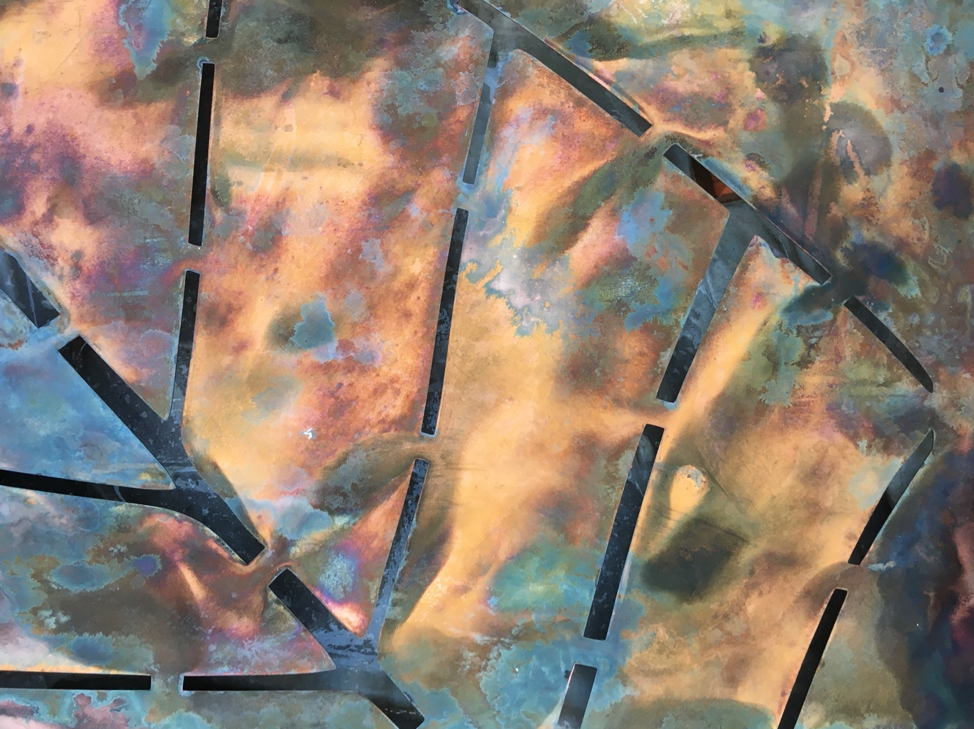
The panels did quickly accumulate rust while waiting in the staging area. Even sanded out the pattern might be visible with a lighter finish. The panels were all sanded with a 60 grit random orbit sander to give the surface a tooth for the patina to react. The sanded metal looked rough but the patina overwhelms the scratches. The last step is to degrease the metal as there is a light coat of oil on it when it arrives and even with sanding, traces of the oil will affect the patina. The panel should have patina and clear coat applied in series as quickly as possible to avoid any new rust appearing.
We tested samples of the patinas on a piece of scrap metal to decide on the look, however I recommend adding the clear coat as part of the sample as the colors change with the coating. Gloss finish retains the most color while satin finish left the colors dulled. I recommend trying techniques on a large piece as the drying and working time may change how large areas are done.
The spray patinas were cold finish so there was no need to heat the panel with a torch prior to applying the solution. The solutions were not diluted either. Some days we had to shade the panels or wait until the afternoon to prevent working on hot steel which would cause the chemical reaction to occur too quickly. Even on a cool metal the large panels had to be sprayed and washed in three sections. A sprayer with baking soda and water could be used to stop the reaction quickly if dousing with water was not fast enough. The soda must be rinsed before clear coating to bring the surface back to a neutral pH.
The panel must be bone dry before applying the clear coat so a heat gun can ensure what looks dry is actually fully dry. If moisture is in the pores of the metal the clear coat will be cloudy or worse, might peel.
The clear coat was a two-part mixture which was best mixed in a large glass or plastic wide mouth jar. This allowed stirring without being exposed to fumes. One cup of mixture was enough for one coat on four sides. The final product had four coats on each side. Spray application was a failure as the electric sprayer put more product in the air than on the surface (enraging the neighbors). Brushing on was OK, though disposable bristle brushes left streaks and some drips. The occasional bristle in the finish had to be cleaned out as well. Four inch foam paint rollers worked very well with a smoother more even finish (still textured). The rollers were good for a few hours before solvents unglued the foam from the roller. Get the rollers in bulk. The rollers were more efficient with product and made fewer drips through the pattern to the back side.
If the next coat was done the same day the previous coat would not be fully hardened and no sanding was needed between coats. Next day coats required a light sanding with 120 grit or coarse steel wool to raise a tooth for getting the coats to stick.
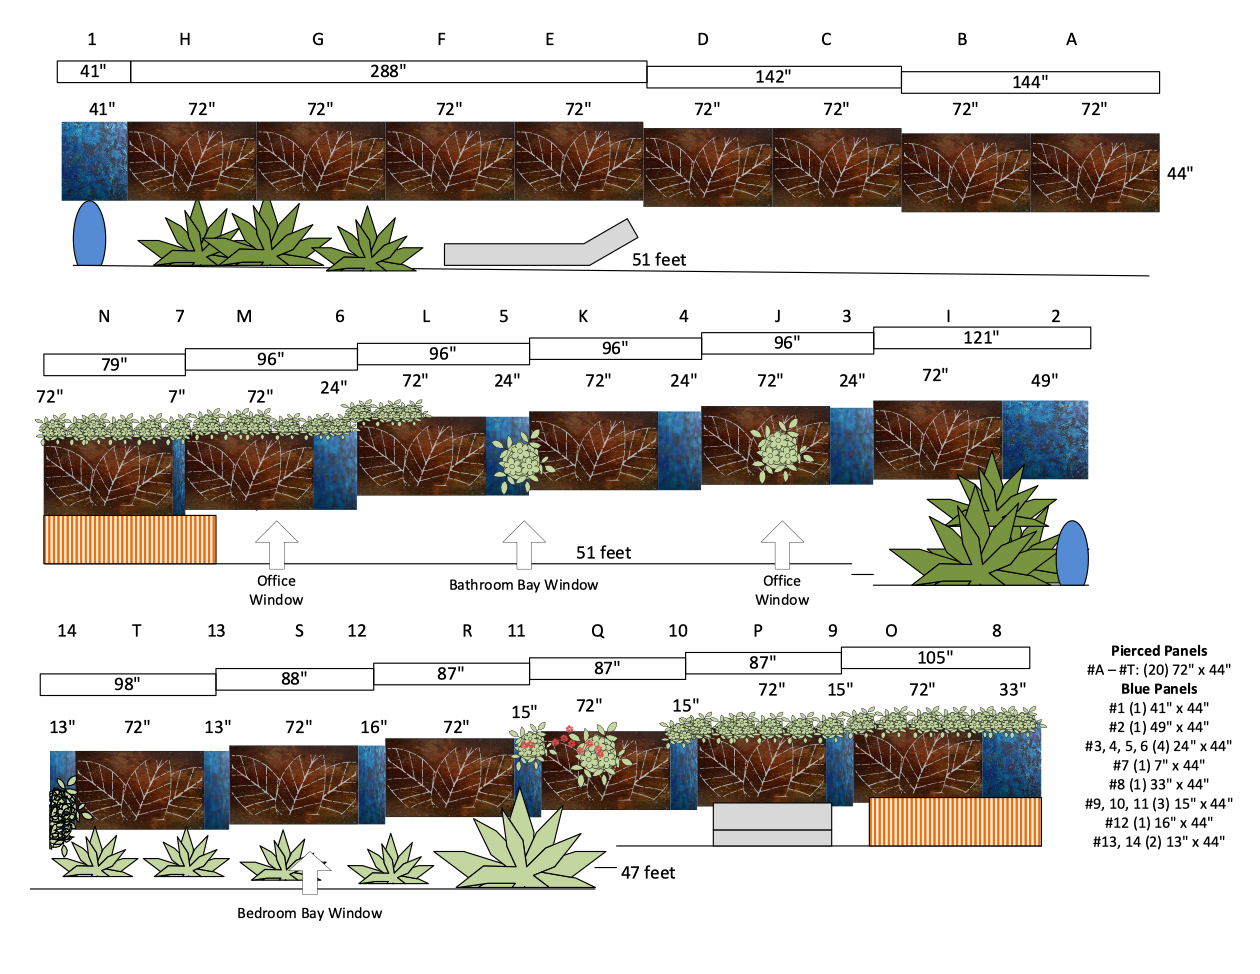
The blue panels were coated with solvent dye which used full strength is more like paint. The dye would dissolve and mix with the clear coat so any patterns in the brushwork had to account for the smearing that would occur later. For flat color a spray paint or powder coat finish could be done.
Ideally the clear coating could be out sourced to a shop with a spray booth for doing auto body repair.
Mounting
The perforated angle iron worked as a replacement to the 2×4 stringers. All bolts were ¼ inch stainless steel with nylon insert hex nuts. Some tight places required a Philips head for a ratchet handle and other tricks. The lower clips were bolted in place and the panel dropped into the channel with a c-clamp at the top to hold it all in place while the upper clips were installed.
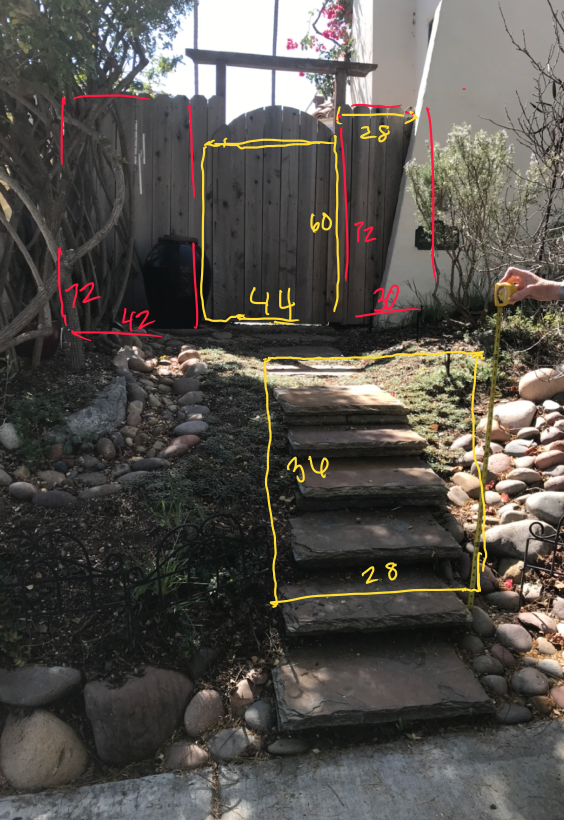
Gates
The gates required welding of tube steel and quotes from fabricators were too high. Fortunately, a shop in Chula Vista specializes in custom order gates. They had a variety of stock designs and could do custom designs as well. The gates were prebuilt with hinges, posts. Latch box, and finish coating. They were transported to the site on the car roof rack. Mounting varied depending on location with the small freestanding gate being the most difficult. A deep post hole was needed.
Hardware
If the design is too open or the gate too short a lock on the latch is not all that effective but additional latches can be added where they can’t be reached. The latches were standard door hardware, keyed on one side. It is nearly impossible to get latches keyed on both sides for safety reasons. The lock box on the gate was perfect. The striker plate that comes with the lock set is made for wood mounting and would no work but the latch fit the receiver hole fine without it.
Supplies
- Spray Paint for Plastic
- Spray Paint for Metal
- Concrete
- Wine Bottles
- Orange Oil
- Boric Acid
- Pierced angle iron (Bobco Metals bobcometal.com)
- 60 and 120 grit sandpaper
- Coarse and medium steel wool
- 4” foam rollers and trays
- Glass and plastic jars for mixing
- Hand sprayers (comes with patina in most cases)
- Baking Soda
- Patina and clear coat and degreaser (Sculpt Nouveau)
- Steel sheets (Industrial Metal Supply)
- Aluminum “F” track – 1-1/2″ x 1-1/2″ for .265″ Material (Eagle Mouldings eagle-aluminum.com)
- Brackets (Strong-Tie)
- Bolts (1/4” Stainless from boltdepot.com)
- Nuts (1/4” Stainless with nylon insert from boltdepot.com)
Equipment
- Random Orbit Sanders (we went through 3 or four of these).
- Hacksaw
- Cutoff Saw
Code Limitations
Fence height limit is 10 feet from ground level. This was generally 9’ max. There are other specifications mostly to consider wind.
Safety
The usual protection for dealing with heavy things, climbing ladders etc. The sanding requires good ear protection. The patina are about as strong as vinegar but should not be inhaled or left on skin for extended periods of time. The clear coat requires a good N95 respirator and good ventilation. Eye protection always.
Photos